DIY Thread Ball Counter Decor: Easy Kitchen Craft Guide
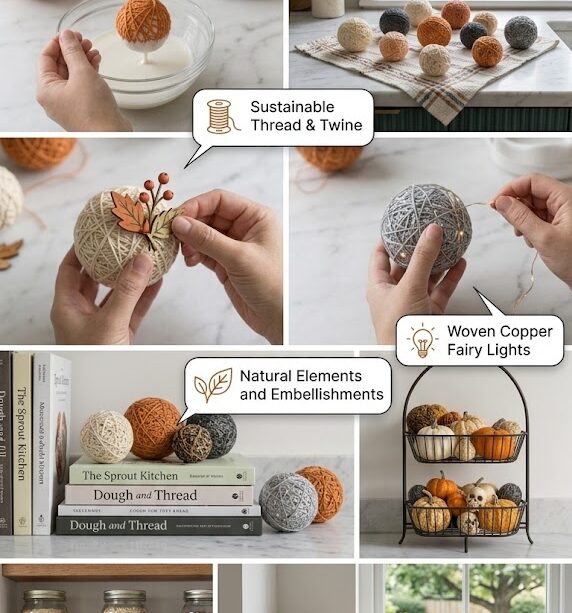
There’s a specific kind of satisfaction that comes from making something beautiful for your home out of materials that cost next to nothing. DIY thread ball counter decor is exactly that kind of project — a genuinely easy kitchen craft that transforms a ball of yarn or twine, a balloon, and a bit of glue into a textured, sculptural accent piece that looks like it came from a boutique home goods store.
If you’ve been browsing kitchen decor inspiration and noticed those soft, woven-looking spheres nestled in bowls or scattered across open shelving, you’ve seen thread ball decor in action. It’s become a favorite among home decor enthusiasts for good reason — it’s inexpensive, endlessly customizable to match any color palette, and genuinely simple enough for a first-time crafter to complete successfully on the first try.
This guide walks you through exactly how to make DIY thread ball counter decor from start to finish, along with styling ideas for how to actually use them once they’re dry. Whether you’re looking to refresh a kitchen counter, fill an empty bowl, or add a handmade touch to open shelving, this craft delivers real design impact for the cost of a few basic supplies you may already have at home.
[Image: styled kitchen counter bowl filled with neutral toned diy thread balls]
Why Thread Ball Decor Works So Well in Kitchen Styling
Before getting into the how-to, it’s worth understanding why this particular craft has become such a popular kitchen decor choice. Thread balls occupy a genuinely useful niche in home styling: they add texture, dimension, and organic softness to spaces that are often dominated by hard, glossy surfaces — countertops, cabinetry, appliances, tile.
A kitchen counter styled only with functional items can feel a little sterile, even when it’s clean and organized. A small bowl of textured thread balls introduces a tactile, handmade element that immediately warms the space up. And because the craft is so customizable — any color, any size, any fiber type — thread balls integrate into virtually any kitchen aesthetic, from boho and coastal to modern minimalist and Scandinavian.
They’re also wonderfully practical from a decorating standpoint. Unlike fresh flowers or plants, they require zero maintenance. Unlike breakable ceramic decor, they’re forgiving of little hands and busy kitchens. And because they’re genuinely inexpensive to make in bulk, you can create an entire bowl or tray full of them without worrying about cost the way you might with a store-bought decorative object.
What You’ll Need: DIY Thread Ball Supply List
The beauty of this craft is how minimal the supply list actually is. Most of these items are either things you already have at home or available cheaply at any craft store.
Essential supplies:
- Cotton twine, jute string, yarn, or embroidery thread (your color and texture choice determines the final look)
- Small balloons (the classic water balloon size works best for smaller, kitchen-scale thread balls)
- White craft glue (Elmer’s or similar) or a fabric stiffening spray
- A shallow bowl or container for the glue mixture
- Water (to thin the glue)
- Petroleum jelly or cooking spray (to prevent sticking)
- Wax paper or a plastic sheet to protect your work surface
- A pin or needle (for popping the balloon once dry)
Choosing Your Thread Material
This decision matters more than it might seem, because your material choice determines the entire aesthetic of the finished piece.
Jute or natural twine creates a rustic, organic look that pairs beautifully with boho, farmhouse, and coastal kitchen styles. The rougher texture and warm tan tone integrate naturally with wood tones and woven baskets.
Cotton string or crochet thread produces a smoother, more refined finish, ideal for modern minimalist or Scandinavian kitchen aesthetics. White or cream cotton thread balls in particular have a soft, cloud-like quality that works beautifully in a neutral color palette.
Colored embroidery thread or yarn allows you to match thread balls precisely to an existing kitchen color scheme — deep terracotta, sage green, dusty blue, or even black for a more dramatic, modern look.
How to Make DIY Thread Ball Counter Decor: Step-by-Step
This project takes some patience for the drying time, but the active hands-on portion is genuinely quick and beginner-friendly.
Step 1: Prepare Your Workspace
Lay out wax paper or a plastic sheet across your work surface, since the glue mixture can get messy. Have your balloons blown up in advance to your desired size — remember that the finished thread ball will be roughly the size of the inflated balloon, so blow them up accordingly for the scale you want on your counter or in your bowl.
Step 2: Mix Your Glue Solution
Combine white craft glue with a small amount of water in your shallow bowl — a ratio of roughly two parts glue to one part water works well for most projects, creating a mixture that’s thin enough to fully saturate the thread but thick enough to hold its shape once dry. Stir until smooth and fully combined.
Step 3: Coat the Balloon
Apply a light layer of petroleum jelly or cooking spray to the outside of the inflated balloon. This step is easy to skip but genuinely important — it’s what allows you to remove the dried thread shell from the balloon cleanly once everything has set.
Step 4: Wrap the Thread
Dip your chosen thread material into the glue mixture, making sure it’s fully saturated but not dripping excessively. Begin wrapping it around the balloon in random, overlapping directions — the more random and layered the wrapping pattern, the sturdier and more visually interesting the finished thread ball will be. Continue wrapping until you achieve your desired density. A looser wrap creates an open, lacy look, while a denser wrap creates a fuller, more solid-looking sphere.
Step 5: Let It Dry Completely
This is the step that requires patience. Hang the wrapped balloon somewhere it can dry undisturbed — from a hook, a clothes hanger, or simply resting in a bowl so it doesn’t touch other surfaces while wet. Drying typically takes 24 to 48 hours depending on humidity and how densely the thread was wrapped. Resist the temptation to rush this step; a thread ball that hasn’t fully dried will collapse or lose its shape once the balloon is removed.
Step 6: Pop and Remove the Balloon
Once the thread structure is completely dry and hard to the touch, carefully pop the balloon with a pin. Gently pull the deflated balloon fragments out through the gaps in the thread structure. This part takes a little patience and careful fingers, but the thread shell should hold its shape perfectly once the balloon is removed.
Step 7: Trim and Finish
Trim any loose thread ends for a clean finished look. If you want extra structural rigidity, you can apply a second light coat of the glue mixture directly to the finished shell and let it dry again — though most thread balls hold their shape well without this additional step.
[Image: diy craft process of wrapping glue soaked twine around balloon]
Styling Ideas: How to Use Thread Ball Decor in Your Kitchen
Once your thread balls are finished, the real fun begins — figuring out how to style them throughout your kitchen for maximum visual impact.
Bowl Filler Styling
The most classic use for thread ball decor is as a bowl filler. A neutral ceramic or wooden bowl filled with a cluster of varying-sized thread balls creates an instant centerpiece for a kitchen island or dining table. Mix two or three complementary colors within the same bowl for visual interest, or keep everything monochrome for a more minimalist, cohesive look.
Open Shelf Accents
If your small kitchen has open shelving, a single large thread ball or a small cluster of three placed among your everyday dishware adds texture and softness to what might otherwise be an all-hard-surface display. This works especially well tucked next to stacked ceramics or a small potted plant.
Kitchen Tray Styling
Group thread balls on a decorative tray alongside a small candle, a stack of coasters, or a small potted succulent for a styled vignette that works beautifully on a kitchen counter corner or island end. This kind of layered tray styling is one of the easiest ways to make budget decor look genuinely curated and intentional.
Garland or String Display
For a more dramatic display, smaller thread balls can be strung together on a length of twine or fishing line and hung along an open shelf edge, across a window, or draped along the front of a kitchen island. This creates a soft, textural garland effect that’s particularly striking during seasonal decorating transitions.
Mixed with Other Natural Textures
Thread balls pair beautifully with other natural, textural decor elements — dried florals, wooden bead garlands, woven baskets, and rattan trays. Combining a few of these elements together in a single kitchen vignette creates a cohesive, boho-leaning aesthetic that feels intentional rather than random.
[Image: styled kitchen shelf with thread balls dried florals and ceramic bowls]
Customizing Thread Balls for Your Kitchen’s Color Palette
One of the best things about this craft is how easily it adapts to any existing kitchen decor scheme, meaning you never have to compromise your color palette to include this accent piece.
For warm, earthy kitchens — use natural jute or tan cotton twine in varying thicknesses for an organic, unbleached look that pairs beautifully with wood tones and terracotta accents.
For modern monochrome kitchens — stick to pure white or soft black thread for a graphic, sculptural effect that reads as intentional and design-forward rather than crafty.
For colorful, maximalist kitchens — dye plain cotton string using fabric dye before starting the wrapping process, or use pre-colored embroidery thread in bold hues that echo other elements in the room.
For coastal kitchens — a mix of white and natural jute thread balls, styled alongside driftwood or a woven seagrass bowl, captures that relaxed coastal aesthetic effortlessly.
You can also vary the size dramatically within a single project — small balloon-based balls for delicate accents, and larger balloons for a single statement piece that anchors a shelf or counter corner on its own.
Troubleshooting Common Thread Ball Issues
My thread ball collapsed after removing the balloon. This almost always means it wasn’t fully dry. Give future projects the full 48-hour drying window, especially in humid climates, and consider a denser wrap for more structural stability.
The thread looks stiff and shiny rather than soft. Your glue mixture may have been too concentrated. Thin the glue with slightly more water next time for a more natural, matte finish.
The balloon wouldn’t release from the thread shell. Make sure you applied a generous, even layer of petroleum jelly or cooking spray before wrapping. Without this release layer, the dried glue can bond too strongly to the balloon surface.
My finished thread ball looks uneven or lopsided. This is usually a wrapping issue — try to wrap thread in multiple directions rather than concentrating it in one area, and rotate the balloon regularly as you wrap to distribute thread evenly across the entire surface.
FAQ: DIY Thread Ball Counter Decor Questions Answered
What materials work best for DIY thread balls?
Cotton twine, jute string, yarn, and embroidery thread all work well, each producing a different aesthetic. Jute creates a rustic, organic look, cotton string produces a refined, smooth finish, and colored embroidery thread allows precise color matching to your existing kitchen decor.
How long does it take for thread balls to dry?
Most thread balls take 24 to 48 hours to dry completely, depending on humidity levels and how densely the thread was wrapped. Denser wraps generally take longer to dry fully than looser, more open wraps.
Can I make thread balls in different sizes?
Yes. The size of your finished thread ball is determined entirely by how large you inflate the balloon before wrapping. Smaller balloons create delicate accent pieces, while larger balloons produce a bold, statement-sized sphere for a shelf or counter corner.
How do I style thread balls in a small kitchen?
In a small kitchen, use thread balls as bowl fillers on a counter corner, tucked among dishware on open shelving, or grouped on a small decorative tray. A few well-placed pieces have more impact in a compact space than scattering many throughout the room.
Do thread balls need any special maintenance?
No. Thread balls are low-maintenance decor pieces that don’t require watering, cleaning, or special care. Occasional light dusting is typically all that’s needed to keep them looking fresh.
Can I dye my thread before making the balls?
Yes. Plain cotton string or twine can be dyed using standard fabric dye before starting the wrapping process, allowing you to create custom colors that precisely match your kitchen’s existing palette.
Why did my thread ball collapse after removing the balloon?
This typically happens when the glue hasn’t fully dried before the balloon is popped and removed. Ensure the structure is completely hard to the touch — with no soft or tacky spots — before attempting removal, and allow the full recommended drying window.
Is this craft beginner-friendly?
Yes, DIY thread ball decor is one of the most beginner-friendly home decor crafts available. It requires no sewing, no special tools, and no prior craft experience — just basic supplies, some patience during the drying period, and a willingness to embrace a little glue-covered mess along the way.
Conclusion
DIY thread ball counter decor is proof that beautiful home styling doesn’t require a big budget or advanced craft skills. With a handful of inexpensive supplies and a little patience while they dry, you can create genuinely elegant, texturally rich accent pieces that elevate your kitchen counter, shelving, or dining table in a way that feels handmade, intentional, and completely your own.
Whether you go rustic with natural jute, refined with soft white cotton, or bold with a color that matches your existing kitchen palette, this easy kitchen craft delivers real design impact for the cost of a craft store trip. Give it a try this weekend — your kitchen counter is about to get a whole lot more interesting.